Annie’s Unusual Swiffer Hacks

My Swiffer hacks are apparently unique to me, which kind of surprises me, as they seem really obvious to me (including how to keep the wet refill wet when mopping, and how to save on wet and duster refills)! Yet if you do a web search for “Swiffer hacks”, every single result is about Swiffer hacks to refill your WetJet bottle, or to use a microfiber cloth instead of the wet refills. (I don’t know about you but I hate microfiber clothes, they just feel so snaggy on my fingers!) Anyways, my Swiffer hacks are different.

The first one is a way to save money by no longer buying the wet refills. The second one is a way to extend the life of the wet refill as you are using it to, you know, mop your floor. The third is all about dusting.

Use Newborn Cloth Diapers Instead of Swiffer Wet Refills

One day I realized that newborn cloth diapers are nearly the exact same size as Swiffer wet refills. Not only that, but while the center part of the diaper (which covers the part of the Swiffer pad that mops the floor) is nice and cushy and absorbent, the pieces on either side are a single thin layer of material, perfect for tucking into the slots!

Newborn Cloth Diapers
newborn diapers

Just get the diaper soaking wet, wring it out, and put it on the Swiffer.

I use these newborn cloth diapers from Amazon, which are $19 for a pack of 12. Not only will you never have to buy wet refills again (and not have to deal with that icky microfiber feel on your fingers, if that’s a thing for you as it is for me) but you’ll find lots of other things for which to use them.

“But Anne,” you may be saying, “What if I actually want a cleaning solution, not just water, to wet mop my floor?”

Read on.

Keep a Spray Bottle of No-Rinse Floor Cleaner with You When Swiffer Mopping

One of the top complaints about the Swiffer wet refills is how quickly they run out of wet. If you do want to keep using the Swiffer wet refills (instead of a diaper), or if you want floor cleaner with your diaper, check out this easy and economical hack.

Fill a spray bottle with no-rinse floor cleaner (after all, that’s what the wet refills have on them).

I use the Members Mark no-rinse floor cleaner, but you can use any no-rinse floor cleaner you like. The Members Mark no-rinse floor cleaner is $30 for 2 gallons on Amazon, but much much cheaper at Sam’s Club (if you have one near you) or from Sam’s Club on Instacart where it is $6 a gallon.

Then, when you are wet-swiffering your floor, when the pad starts to run dry, just spritz some of that no-rinse floor cleaner down on the floor. I keep that spray bottle in one hand, mop with the Swiffer with the other, and I am never frustrated by having too much floor left at the end of the wet.

Use Swiffer Dry Sweep Refills to Dust With

Swiffer sells a duster with duster refills. Those duster refills are $1.25 each! Guess what!? The Swiffer dry sweeping cloths work just as well (in some instances even better) and are just .25 per! Got places or things that you really need that duster to reach and dust? Fine, save your Swiffer duster and pricey duster refills for that, and go to town with the much cheaper dry sweeper cloth for everything else! Plus the dry sweeper cloths are much easier to get into tight places to get all of that dust.

And those are my Swiffer hacks! I hope that at least one of them was useful for you!

The Best Way to Make Cold Brew Coffee Plus No-Mess Coffee Grounds! Also: the Best Ratio for that Cold Brewed Coffee!

Yeah, “The Best Way to Make Cold Brew Coffee is Also the Easiest Way to Deal with the Grounds – Also: the Best Ratio for that Cold Brewed Coffee!” is a long title, but I needed to let you know what you’re in for. So hang on, because I’m going to rock your cold brew world! (Update: Ok, I just changed it to “The Best Way to Make Cold Brew Coffee Plus No-Mess Coffee Grounds! Also: the Best Ratio for that Cold Brewed Coffee!”..slightly better.)

Before we go any further, let’s clear up something at the outset: when you brew cold brew coffee you are making a coffee concentrate, which, in order to drink, you will first dilute with water (unless you’re looking for a crazed-weasel level of caffeine). That is one of the two perfect ratios people want to know – how much coffee concentrate to how much water. More on that below.

We got on the cold brew kick because – let’s face it – we’re lazy (which made dealing with cold brew grounds..heck, any grounds, a hassle, which makes our discovery even all the more exciting, but more on that in a moment).

The fact that it makes a cup of coffee so smooth that even if you slathered a baby’s bottom with the smoothest of mashed avocado, and topped it off with whipped cream, it couldn’t compete, is just an added benefit.

And the fact that cold brew allows you to tweak the strength of your coffee to just how you like it – from ‘delicate with a hint of coffee aroma’ to ‘motherfather can we dial it down to just high octane’? Another added benefit.

Have I mentioned that we’re lazy? And that we don’t like to deal with the grounds?

This is the lazyperson’s cold brew method, and the fact that it just happens to make amazing, smooth coffee is a bonus. Or, if you aren’t so lazy, then the fact that this cold brew method, that makes amazingly smooth coffee, is also super easy to make and super easy when it comes to dealing with the grounds is the bonus.

Either way, I’m sure you’ll agree that it’s PDA (that’s Pretty Damn Awesome, not public display of affection, although those are PDA too (see what I did there?)).

First we tried making it with our French press. It worked ok, but part of the whole laziness thing is that dealing with those grounds is a hassle.

So then, thinking it would be less hassle (and hey, more coffee!) we got one of these:

cold brew coffee maker

(That’s the “Takeya Deluxe Cold Brew Iced Coffee Maker with Airtight Lid”, which not only was even more of a hassle, but apparently that “airtight lid” isn’t water-tight – it leaked (only slightly, but still).

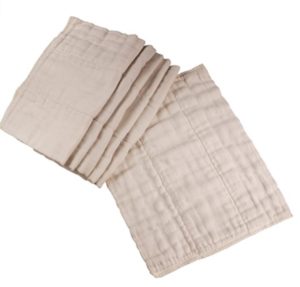
One day I was cleaning out the cupboard, and came across something that we had used months before in our futile efforts to make dealing with spent coffee grounds easier. They were filters for our French press (yes, we’re that lazy). My other half didn’t love them (hot coffee grounds and all that), so we used one, and then put the other 99 in the cupboard and promptly forgot about them.

Until I was cleaning out the cupboard and saw them, and pulled them out, and was just about to post them on Nextdoor in case someone else with a French press wanted to try them – seriously, I had already written the post and was proofreading it before pressing ‘send’ when…

LIGHTBULB!!

“Hey, these look like they would just fit in a Mason canning jar!”

(Yeah, we have talking light bulbs at our house.)

And thus the Best Way to Make Cold Brew Coffee Plus No-Mess Grounds (BWMCBCPNMG) was born! And here it is.

The Best Way to Make Cold Brew Coffee Plus No-Mess Coffee Grounds! Also: the Best Ratio for that Cold Brewed Coffee!

For this method you will need:

  • Mason (or other) 1 quart canning jars – as many as you want to store in your fridge at once
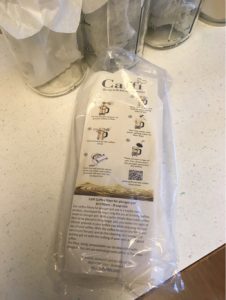
  • French press coffee filters (see link below)
  • Coffee (obviously) – course ground, as for a French press, is best

Instructions

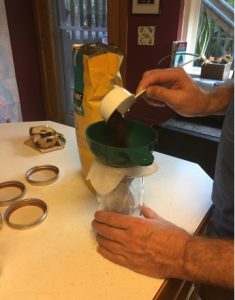
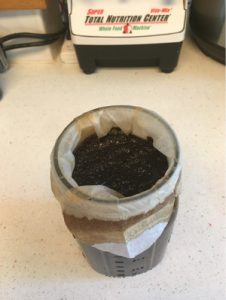
Open and insert one French press coffee filter into each empty Mason jar, folding the top down over the outside of the jar.

best way to make cold brew coffee empty jars with filters

Measure 2/3 cup coffee grounds (there’s that magic ratio) into each filter. So that ratio is 2/3 cup grounds to nearly 1 quart of water (nearly because even though you will fill the jars with water, some of the volume is taken up by the coffee).

Note that we use a canning funnel to do this, which makes it so much easier. You can get a canning funnel at most hardware stores, or on Amazon here.

measuring the coffee grounds for cold brew coffee

coffee in filter cold brew mason jars

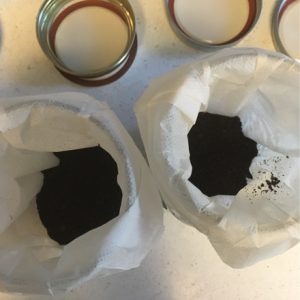
Now, slowly add water to each jar, using a spoon to make sure that all of the grounds are moistened as you add the water. You do not want any of the grounds at the top to be dry!

adding water to cold brew coffee


Side view
water in cold brew mason jar


Top view
top view cold brew coffee


Be sure to fill the jar so that the water comes to nearly the top of the jar!

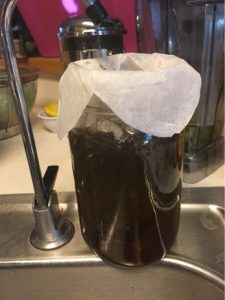
Now, keeping the top of the filter folded down over the outside of the jar, screw the lid on.

make cold brew coffee in mason jars

three jars of cold brew coffee in mason jars

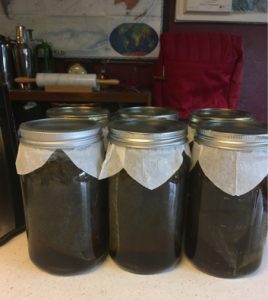
Leave the filled jars on your counter for 12 to 24 hours, depending in part on how strong you like to make your cold brew, and in part on how lazy you are. We make ours in the evening, and leave it on the counter overnight for at least 12 hours. We also make enough for a week at a time.

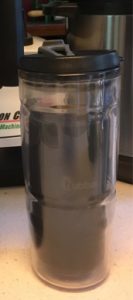
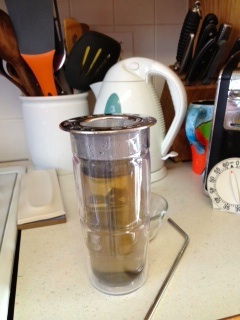
When they are done (or, if you are like us, when you come out in the morning) they will look like this:

cold brew coffee in canning jars done

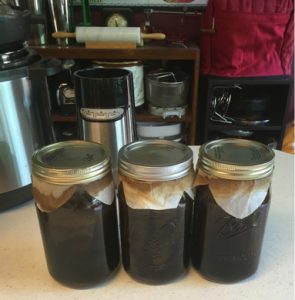
Note that while the filters will be discolored at the top on the outside, they will not leak or drip onto your counter.

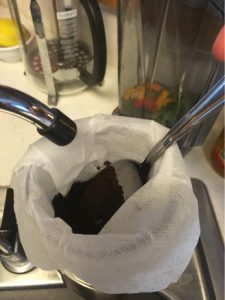
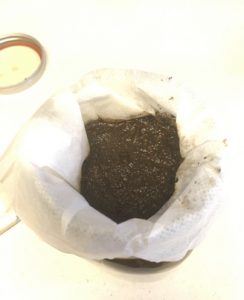
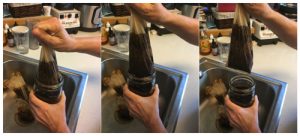
Now take the cap off…

cold brew coffee done with cap off

fold up the sides…

cold brew coffee in canning jar with filter folded up

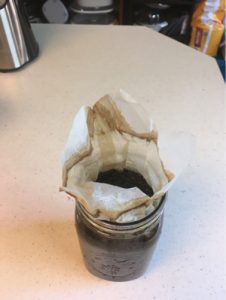
and holding the filter closed, gently start pulling the filter up so that it can drain down into the jar.

removing filter cold brew coffee

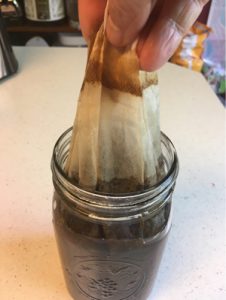
You will probably want to remove the filters over your sink or some other receptacle. Once they are completely drained, you can compost them (yes, the filters (link below) are compostable), or empty them out into your garden, or otherwise dispose of them.

removing cold brew coffee filters

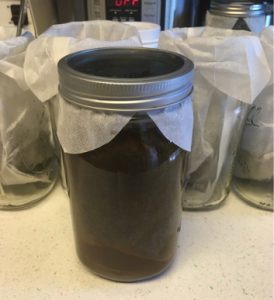
You now have jars full of amazing cold brew coffee concentrate, to which you can add cold water, cold water and ice, or hot water!

Wonderful, smooth dark brew coffee, the lazy person’s way!
yummy cold brew coffee

By the way, there are really two perfect ratios for making cold brew coffee. The first is the grounds:water ratio (which will differ depending on method, taste, and grind – for this method we have found the perfect ratio to be 2/3 cup grounds per full jar). Of course the ‘taste’ part means that there really can be no “perfect” ratio, but for this method the 2/3 cup grounds per jar is a darned good start.

The second “perfect ratio” is the cold brew concentrate to water ratio for when you are making your coffee to drink. And if there can really be no perfect ratio for making the cold brew concentrate, there can really be no perfect ratio for how you use it! It’s entirely to taste, depending in large part on how strong you like your coffee. Some people even drink this stuff straight! Most, though, will do either a 1:2 ratio (coffee concentrate to water) or a 1:1 ratio. So start there and adjust to..you got it..taste.

Ok, the filters that we use are the Caffi brand French press coffee filters, and you can get them on Amazon here. You may be able to get them elsewhere, but I’ve only been able to find them on Amazon. Fortunately they are only .21 each, at $21 per 100 pack.

cold brew coffee filters

Enjoy!

Audio of Crazy Lunch Menu Man David Price Reading School Lunch Menu

crazy lunch menu man audio

The other day I was talking with Mah Mayun about David Price, a/k/a the Crazy Lunch Menu Man, or just the Crazy Lunch Guy. He is the man who used to read off the school lunch menu, in an over-the-top fashion, for certain schools. For example, you could call the Charlotte Observer’s information line, punch in a code, and get the school lunch menu information for the City of Charlotte public schools.

Anyways, I was talking with MM about the crazy lunch guy, and as it happens he had never heard of David Price, or the phenomenon that was the Crazy Lunch guy.

So I started searching for a recording or three of the crazy lunch guy reading some of his menus, and I could only find one. One, on the entire Internet! And that one, posted many years ago, was on Soundcloud. It was posted to Soundcloud 5 years ago, to be exact, by the creatively handled “user227375821”.

Knowing as I do that anything posted to the cloud is really just posted to someone else’s computer, and therefore the one extant recording of Dave the Crazy Lunch Menu Man reading a lunch menu could disappear without a trace 💣 just like that, I grabbed the sound file (I’m fairly sure that user227375821 won’t mind), so that it could be preserved here for posterity, and I am posting it at the end of this post.

Not only that, but through the magic of Archive.org I found an old Salon article about the Lunch Menu Man, and through that I found another recording of Price, introducing himself, as, yes, The Lunch Menu Man! I’ve included that as well.

The Salon article, which was published in the summer of 2000, and written by author and McSweeney’s founder Dave Eggers, explains that, among other things, Price was then “a 34-year-old former car salesman who for the past year has been reading the Charlotte, North Carolina school lunch menus for a local voice mail system.”

Eggers then pursued an interview with Price and seemed surprised when “he sounds like a normal person,” explaining that “In fact, he seems downright nice — kind and polite and seemingly concerned with keeping kids in school and well-fed. He says he is married and has three young children. But just when I am ready to believe in his normalcy, when I start feeling like the existence of the Lunch Menu Man is a perfectly regular thing, I come to my senses. I was talking to a grown man who reads, like a raving madman, children’s lunch menus — and makes a living doing it. How? Why?”

The article then goes into Price’s background, and how he came to end up as the crazy lunch guy. Eggers explains that, once getting the lunch menu job, “With no prior experience as a professional lunatic, he simply began reading the standard menu as if he were in the deepest depths of delusional DT’s.”

You can read Eggers’ original Salon article here at Archive.org.

By the way, David Price wrote a book called Out to Lunch: The Lunch Menu Man’s Guide to School Lunch, which Amazon says is a “collection of wacky jokes, song parodies, and short stories about lunch includes tidbits on such celebrity foods as “Okra” Winfrey and “Johnny-Cake” Depp, as well as the scoop on the First Annual Grammy-cracker Awards.” You can still get copies of the Lunch Menu Man’s book on Amazon here.

Here’s the audio.

David Price introducing himself as the Lunch Menu Man

Audio of the Crazy Lunch Menu Man reading 3 different lunch menus

Searches that led to this article: https://www mangemerde com/audio-of-crazy-lunch-menu-man-david-price-reading-school-lunch-menu/,  

Here’s Where to Rent a Wheelchair in the Denver Colorado Area

wheelchair rentals colorado

When I first had my hip replacement it became very clear that I was going to need a wheelchair for a while. I ended up buying my own wheelchair along with lots of other stuff, but for the first few days I didn’t realize that was what I as going to need to do, so I set about looking for wheelchair rentals in Boulder – which quickly turned into a search for renting a wheelchair just about anywhere in Colorado! It turns out that there are very few places in the Boulder / Denver / all of Colorado area where you can actually rent a wheelchair! Not in Boulder, not in Ft. Collins, and barely in Denver. Fortunately, after quite a bit of searching, I found one of the few places in Colorado that rents wheelchairs, and as fortunately, they are great! I committed that I would write this place up so that nobody else has endure hours of frustration trying to find a place to rent a freakin’ wheelchair in the greater Denver area of Colorado!

The place that I finally found, Mobility 4 America, is a one-man operation. That man is Tom Johnson, and believe me when I tell you that he has your best interest at heart. He runs the business from a home office, and when you go to pick up your wheelchair that you are renting from him, you’ll be meeting him at his house – or at one of a couple of other locations in the Denver area that he uses.

Because of this setup, he is pretty flexible in terms of when and where he can meet you. In my case, I got ahold of him on a Sunday morning (!) and by Sunday afternoon I was ensconced in my rental wheelchair (!!).

His prices are very good as well – I was pretty surprised by how little it cost to rent a wheelchair for a week!

He also rents power chairs, scooters, ramps, and lifts.

Tom’s website is mobility4america.com, and his telephone number is 303-455-4225.

This $3 Device Will Make Your Teeth Whiter

Yes, it’s really true. I didn’t believe it myself, but I figured what the heck, I can afford $3.00 to check it out. The device is a “LED Accelerator Professional Teeth Whitening Light”, and it actually works to accelerate the whitening process when used with tooth whitening gels.

Why does it work? I have no idea. According to the Journal of Dentistry, “the treatment with supplementary light showed significantly greater bleaching-dependent changes in color compared to treatment without light when assessed using instrumental methods.”

According to me, holy cow! This thing arrived – and remember, I paid only $3.00 for it (it arrived from China… I’m just sayin’), – and it really works. Using whitening gel in trays, and this light, I’ve seen a huge difference.

So now I’m sharing this information with you, my faithful readers. (By the way, be aware that there are two disc batteries in the light, and they have a piece of plastic in with them to keep the batteries from discharging during shipping – you need to remove that piece of plastic for the light to work.)

Check out the LED tooth whitening accelerator light on Amazon

P.S. This is the whitening gel that I use.

At Last! A BPA-Free, Dishwasher-Safe Thermal Travel Cup which Accommodates a Stainless Steel Straw!

It became something of a holy grail for me: I love me my stainless steel straws (which are by definition also BPA free) and I’d been looking for ages for a thermal tumbler or thermal mug (i.e. a travel mug or travel cup) which was a) BPA-free, and b) dishwasher safe, and c) could accommodate my stainless steel straws through its sip hole (many sippy holes are too narrow to accommodate a rigid straw). If it was wide enough to also accommodate my favorite tea strainer, so that I could brew my morning cup of tea (lapsang souchong, thank you very much) all the better.

Here’s the thing: it’s crazy hard to find thermal travel mugs that are both BPA-free and dishwasher safe. In fact, it’s hard to find any travel cup or travel mug that is dishwasher safe, period.

So now, after months and miles of searching, I have found the perfect travel tumbler: BPA-free and dishwasher safe, and it works with both my tea strainer and my stainless steel straws.

And, even better, it’s about half the price of many of the other travel cups out there!

The Bubba ‘Envy’ tumbler promises to keep your hot drinks hot for up to 3 hours (and cold drinks cold for up to 5 hours), and retails on Amazon for about $10.00. Such a bargain!

Combine this with these stainless steel straws (a 4-pack for $10.95 – that’s just $2.25 per straw), and you have the perfect travel beverage set up. (The reason for the straws even with warm liquid like your morning coffee or tea is two-fold: first, it’s safer to drink from a straw when behind the wheel because you never have to tip your head back to get to the liquid at the bottom; second, it helps keep your teeth from getting so stained as you aren’t filtering your coffee or tea through your front teeth.)

And, if you want to be exactly like me (and let’s face it, who doesn’t?) you can start your morning with some wonderful Lapsang Souchong tea. If you’ve never tried it, you owe it to yourself to try it at least once – it has a wonderful, smoky flavor!

bpa-free-thermal-travel-mug

Here are some direct links for you:

Tool-Using Octopus Caught on Film – Video of Veined Octopus Building Coconut Shell House

In an incredible display of just how smart the octopus is – and how they are capable of forethought – Dr. Julian Finn of Museum Victoria in Australia has caught on film a veined octopus transporting coconut shells for the express purpose of building a shelter (and then doing so).

Says Dr. Finn, of the moment when he realized that he had evidence of an invertebrate using tools, “I was gobsmacked. I mean, I’ve seen a lot of octopuses hiding in shells, but I’ve never seen one that grabs it up and jogs across the sea floor. I was trying hard not to laugh.”

Here is the video of the veined octopus carrying the coconut shells and using them to create a shelter:

A Better Alternative to the Ped Egg

If you’ve been wondering if the at home pedicure foot care product the Ped Egg is worth it, well it’s not. If you have a PedEgg and are disappointed in your PediEgg experience, well, you’re not alone. But most importantly, if you would like a rocking alternative to the Pedi Egg, well, I’ve got it!

First, it’s important to understand what the Ped Egg is – it’s basically a microplane foot file. Now, as foot files (files to remove dead and dry skin from the feet) go, using a microplane foot file is a great idea.

The problem is that the Ped Egg is made of cheap materials, and so the microplane foot file edges aren’t as effective as they could be, and they get dull very quickly. Indeed, that’s where Ped Egg makes their money – selling Ped Egg microplane foot file refills.

One day, as I looked at the real MicroPlane sitting unused in my kitchen utensil drawer, it dawned on me. Why not use it and see if it did a better job then the Ped Egg?

Let me tell you, it did. Not only did it do a far better job, but it was much more convenient. The Ped Egg has no handle – you have to hold it cupped in your hand. And while the Ped Egg does have a “dead skin catcher”, if you don’t hold the Ped Egg at just the right angle, the dead skin still comes sprinkling back out through the microplane holes.

On the other hand, the real MicroPlane has a much longer surface than does the Ped Egg, making it much easier to reach all the areas on your feet, and it has a handle, making it easier still. And it’s not likely to get dull after just a few uses.

So what to do about all the dead skin that comes off when you use it on your feet for your at home pedicure? Do it over a paper towel. Or do it standing next to the toilet with your foot on the rim and let the dead skin get flushed away.

Here is the MicroPlane that I use which, by the way, gets 5 stars from nearly 8,000 customers at Amazon, and costs only $1.00 more than a Ped Egg (and that’s not counting the cost of the Ped Egg refills).

Searches that led to this article: ped egg,  http://www mangemerde com/a-better-alternative-to-the-ped-egg/,  https://www mangemerde com/a-better-alternative-to-the-ped-egg/,  

Finally! Shred Proof Litter Box Liners!

We have finally found the perfect shred proof cat box liner! While this is truly the world’s best cat litter box set-up, we recently had to put our cat box in a space where that style of litter box wouldn’t work. We had to go to a non-covered cat pan, and once we did that, we wanted to start using litter pan liners, but even the ones claiming to be shred resistant – let alone shred proof – cat box liners, well, weren’t! But we found something that is truly cat shred proof!

Here’s our secret – trash compactor bags! These things are thick and simply don’t shred!

Just take your cat litter box pan, slide it inside the trash compactor bag to the end, tuck any excess underneath (or if you have a pan with a snap on rim, as do we, just snap on the rim) and you’re in business! When you are ready to change your litter, just carefully turn the bag inside out as you remove it from the pan, and your old litter is nicely enclosed and ready to toss!

And they’re cheaper than those fancy litter box liners, too!

Check it out! You can get a box of 40 shred-proof cat box liners – a/k/a trash compactor bags – here

Vegan UGGs Boots – Half the Price and None of the Suffering

I was so excited to find Vegan UGG Boots – well, Vegan UGG style boots, that is – and for a fraction of the price of actual UGGs! And they are so comfortable! All of the comfort, half the price, and none of the suffering!

And actually, they are generally not even half the price – with genuine UGG boots running between $90 and $160, the vegan UGG-style boots are a real bargain at $30 to $35 dollars.

Yes, you read that right – Vegan UGGs are only $30 to $35 a pair!

It seems counter-intuitive that a specialty boot – vegan boots – would be so much less expensive, but when you think about it, it really does make sense. After all, think about what has to go into making each type of boot.

I ordered the black vegan Uggs, but I have to tell you that I am sorely tempted to order the purple ones!

One note: because I’m in Colorado, and it’s winter, I waterproofed the heck out of these with three coats of shoe waterproofing for fabric shoes. It worked great, and it had no effect on how the boots looked at all.

You can find links for both the black and purple vegan UGG boots below, along with a few others.