OMG! I *finally* figured it out! I’ve been guesting on a fair number of video podcasts lately and my Macbook Pro camera always had my face filling the screen! Extreme closeup! Ewwww! Nobody in a Facetime or Zoom or Facebook Live or Substack Live *needs to see my pores!*
And I could *not* figure out how to make it zoom out a little, try though I might, and *search* though I might. Because you see all of the directions that I could find online talked about either ‘switching from 1.0x to 0.5x’ or ‘scrolling through the continuous control’, *neither* of which I could find!
Now, I knew enough to know that I had to actually have the camera activated in order to figure this out. So I jumped into an empty Zoom to do so.
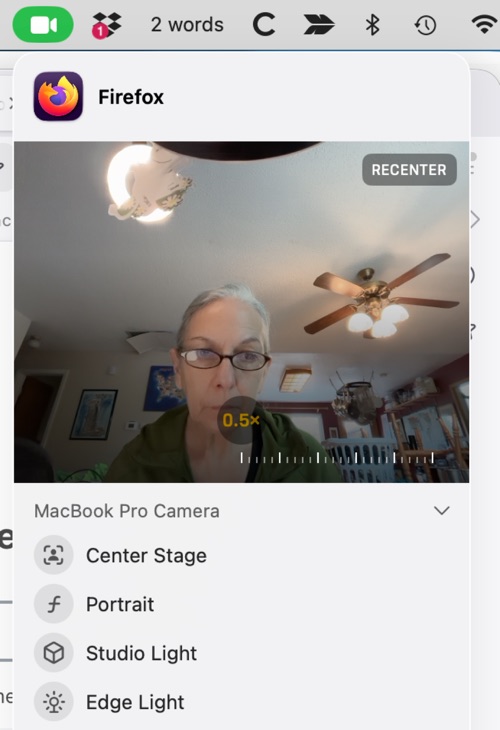
Once you activate the camera like that, the video camera icon (some will recognize it as the Facetime icon) will light up green on your menu bar (at least it does on mine). And you have to click on that camera icon in the menu bar.
Well, I knew that too. And when you click on that camera icon it gives you a drop down of possible action, which are:
Center Stage (turn that thing off immediately, it’s creepy as hell *for others who are seeing you* when your camera follows you – which is what Center State does)
Portrait
Studio Light
Edge Light
Reactions
—
Notice what’s not there? Yeah, Zoom.
I looked and looked, and futzed and futzed, and during one of those times my hand must have slipped a bit on my trackpad and suddenly I had moused-over (trackpadded-over?) the actual image that is the preview of what the camera is seeing.
And there it was, in all its glory – THE ZOOM BAR!!!
So, if you, like me, have been trying to figure out how the heck to get your Macbook or Macbook Pro camera to zoom the **** out so that your fellow video chatters can’t count your nose hairs, now you know.
(This was done on my 2026 Macbook Pro, so if you are on a different Macbook your mileage may vary, but I’m betting not by much.)
P.S. If this was helpful for you, please drop me a comment and let me know!