If any of you have struggled with a dog who is vehemently nail-trimming averse, here’s how I, just by pure luck, figured out how to get my dog to let me trim her nails. Now, I’m not telling you how to get your dog to let you trim their nails, I’m telling you what worked for me. This is not medical, veterinary, trainer, or any other professional advice, just me letting you know what worked for me.
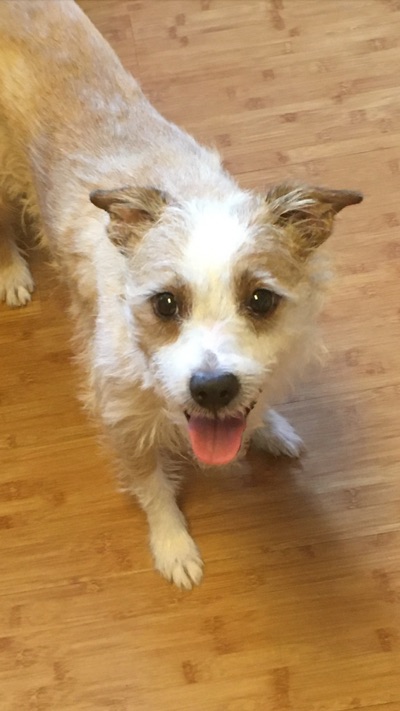
My pup Lily is a rescue; she was picked up on the mean streets of Texas and placed in a high-kill shelter. I am *sooo* thankful that a rescue transport service pulled her from there and transported her to Colorado, to a Colorado rescue. (I’m honestly getting teared up writing this, thinking of how it could have so gone the other way in that high-kill shelter.)
Anyways, after I adopted her I obviously had to deal with her nails. She *clearly* wasn’t down with that. At all. So at first I had my awesome house-call vet do it out in her fully tricked-out house-call mobile exam room and lab, but Lily was so…I guess traumatized?.. from her various ordeals that she literally shook in terror any time I handed her off to the vet. So I didn’t want to add to that by having the vet force her to get her nails trimmed, no matter how gentle the vet was. I wanted to minimize her trauma, not add to it.
I bought so many different clippers, each promising to be the holy grail of clippers; nothing doing.
And have I mentioned that in addition to whatever she had been through before she came to me, she’s half CHIHUAHUA? Chihuahuas are NOTORIOUS for *hating* having their nails trimmed.
One evening I was sitting on the couch with Lily, and my eyes fell upon my nail file that I keep nearby for myself. And I thought, thought I, “Hrrrmmmm…”.
So I picked up my nail file and let her sniff it, and then very gently ran it across a single nail on her hind foot (she is also much more “don’t you touch my feet” about her front feet).
I didn’t try filing the nail, just dragging it across once, barely touching the nail, to see how she would react.
She didn’t hate it. Or, at least, she didn’t freak out, and didn’t try to pull away.
Over the next several days I repeated it, adding a couple of nails, and swiping it a bit more so as to actually file a *tiny bit* off the nails I was testing.
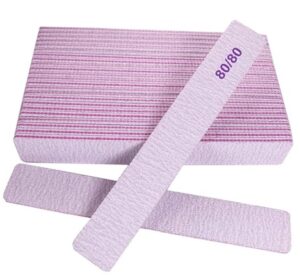
When that seemed to go well, I ordered these high-grit emery boards (they call them nail files, I think they are actually properly called emery boards). This is NOT an affiliate link:
https://www.amazon.com/dp/B0C147852S
I slowly worked our way up to her letting me do all four feet, one foot at a time, and giving her a treat after each foot is done (she’s very food motivated, which definitely works to our advantage in this situation). I cradle her on my lap, on her back, like a baby – that’s what works for us – and I give her a treat before we start, and then I treat her after each foot, with lots of praise. And they are special treats that she only gets when we do her nails.
And once she was totally cool with that routine, THEN we started working on the endgame: letting me use a grinder.
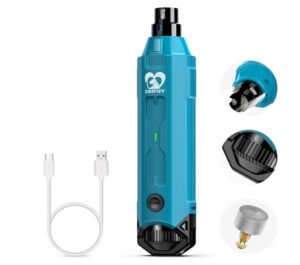
I did a fair amount of research on grinders, and this is the one with which I ended up (also NOT an affiliate link); it consistently had the best reviews for low noise, low vibration, and many speed settings, including a *very* low one:
https://www.amazon.com/dp/B0CQC8N7T1
Now, and this is *very important*: when I first introduced the grinder I *didn’t turn it on*.
I pretended like it was just a funny-shaped nail file, and we did our exact same routine, but with me using the *not turned on* grinder as the nail file.
Because she was already letting me file her nails with that emery board, she barely blinked at the change from the emery board to the not-turned-on grinder (which of course didn’t really do any filing down of her nails, but I was thrilled she was accepting it).
After a couple of weeks of using the grinder as a nail file, I turned it on the very lowest setting, and with bated breath, put it on one of her nails. She noticed, but she let me do it.
Over the next weeks I slowly started adding more nails, a few at a time, first only her back feet (because of her being more skittish generally about her front feet). I *always* listened to her and if she pulled a foot away, I didn’t push it. But that really only happened a few times, for the most part she let me do it, and eventually became ok with it.
The last part was slowly turning up the speed (which may or may not be necessary, your milage may vary); turning up the speed basically just makes it take less time.
And I’m happy to say that she now readily accepts me doing her nails, all four feet, with the grinder!
Miss Lily