Yes. I am THAT She Devil. The original, shedevil at vix.com. You know:
I am: mom, attorney, fathers' rights advocate
Actually, I'm a lawyer -and- I play one on tv.
Yep..that's me.
When I first had my hip replacement it became very clear that I was going to need a wheelchair for a while. I ended up buying my own wheelchair along with lots of other stuff, but for the first few days I didn’t realize that was what I as going to need to do, so I set about looking for wheelchair rentals in Boulder – which quickly turned into a search for renting a wheelchair just about anywhere in Colorado! It turns out that there are very few places in the Boulder / Denver / all of Colorado area where you can actually rent a wheelchair! Not in Boulder, not in Ft. Collins, and barely in Denver. Fortunately, after quite a bit of searching, I found one of the few places in Colorado that rents wheelchairs, and as fortunately, they are great! I committed that I would write this place up so that nobody else has endure hours of frustration trying to find a place to rent a freakin’ wheelchair in the greater Denver area of Colorado!
The place that I finally found, Mobility 4 America, is a one-man operation. That man is Tom Johnson, and believe me when I tell you that he has your best interest at heart. He runs the business from a home office, and when you go to pick up your wheelchair that you are renting from him, you’ll be meeting him at his house – or at one of a couple of other locations in the Denver area that he uses.
Because of this setup, he is pretty flexible in terms of when and where he can meet you. In my case, I got ahold of him on a Sunday morning (!) and by Sunday afternoon I was ensconced in my rental wheelchair (!!).
His prices are very good as well – I was pretty surprised by how little it cost to rent a wheelchair for a week!
He also rents power chairs, scooters, ramps, and lifts.
If you’re wondering how to prepare for a hip replacement, and what to expect from that hip replacement, let me tell you my experience. As those of you who follow me on Facebook (and if you don’t yet, I invite you to do so) know, I had a total hip replacement 19 days ago (I’m writing this on August 12, 2017). Let me tell you that it has been nothing like I expected or was lead to believe. Here is what you need to know before your hip replacement, and what you need in order to prepare for your hip replacement, including links to things that will make your life much easier. Here’s what you need, and will want, to know. Now, I had a posterior hip replacement, so if you are having an anterior hip replacement your mileage may vary, but only by a few miles per gallon. (Note: Text links are not affiliate links, because I want you to trust what I’m saying. Images are affiliate links only because that’s the way that Amazon makes it easy to embed them. So click on the text links, not the pictures (unless you feel you want to reward me for this info. :~) ))
I was surprised to discover is that hip replacement is much like childbirth inasmuch as you are told very similar lies. If you or your spouse has ever given birth, you know that one of the biggest lies out there is “Oh, you won’t even remember the pain!” BS! Childbirth hurts like h*ll, and I bloody well remember it even though the last time was nearly 20 years ago. But I digress…
Hip Replacements and Pain
The first lie is “the pain from the hip replacement is much better than the pain your hip is giving you, in fact you will get immediate relief.” It is true that you won’t feel any pain in your hip, because they have basically decapitated your femur and removed those nerves along with it.
What they don’t tell you is that the pain in the muscles that were manipulated to get the appliance in, etc., and from the incision itself, is going to be hellatious.
Fortunately, they give you great painkillers for this.
Unfortunately, those painkillers may very well cause you to become so constipated (look it up) that you may end up impacted (look that up too). So if you’re planning on taking the narcotics, plan ahead. Finding a balance between too loose (you do not want to suddenly need the bathroom urgently, because you won’t be able to make it) and too-damned-hard is tricky. Oh, you also can’t take most laxatives or in fact most over-the-counter preparations of any kind, because you’re going to be on blood thinners, which are negatively affected by just about everything (more on that later).
How Quickly You Will be Back to Your Old Self
The next lie is “I/Someone I know had a hip replacement and they were walking/running/dancing/skiing/mountaineering/paragliding the following week.”
Now, occasionally some of this is true, but what they didn’t tell you (or didn’t know) is that person’s doctor told them to barely walk on it at all for as many as six weeks. Those people who say they were up and running within days ignored their doctor’s advice. Don’t believe me? Go ahead and start doing some online research for total hip replacement recuperation guidelines. In fact, do it anyways because it will reveal to you all of the restrictions that you didn’t know you were going to be under. Some of them forever.
I hasten to add that this isn’t to say that getting a total hip replacement isn’t worth it – it totally is (see what I did there?) – but going in eyes wide open is so much better than having nasty surprises when you wake up on the other side.
Anyway, where was I? Oh yes, you should expect to only be allowed to “toe touch” with your operated-on leg for the first several weeks – or if your hip install went supremely well, maybe you will be allowed to put 20-to-25% of your weight on that leg (however one determines that) when you are standing still, such as in the shower or “at the sink”, as my surgical team told me (because yeah, you’re going to feel like doing dishes). Either way, you will be using a walker and/or crutches for the first few weeks. All. The. Time.
On the other hand, you may end up like I did, not being allowed to put any weight on that leg – meaning I’m not even allowed to toe touch with that leg for 6 weeks. Which means hopping around on one leg with a walker or crutches, which gets old really fast. Not to mention that it’s really painful.
So you will end up sitting a lot. Only guess what. You also are not allowed to sit upright (well, technically you are allowed to sit upright but not a smidgen more than upright – anything more acute than a 90° angle is strictly forbidden or you may dislocate your new hip.
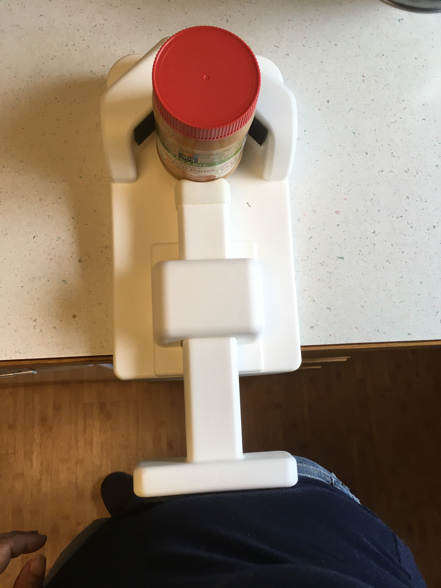
So, if you are anything like me, and wanting to make this not-being-allowed-to-walk-on-your-operated-leg-or-sit-straight-up as non-unpleasant and workable as possible, you may want to get a wheelchair or two.
Now, before I talk more about this, I realize that buying a wheelchair, let alone two, may sound extravagant, but hear me out.
First, you do not want to dislocate that new hip!
Second, unless you plan to lay around in bed all day for weeks, you are going to want to be able to get around easily, both in your own house, and while you are out of the house.
Third, they are a legitimate medical expense which (my tax attorney promises me) you can deduct from your taxes. (Note that your medical expenses need to exceed 10% of your adjusted gross income for the year in which you want to deduct them in order to qualify. If you are having major surgery, the odds are good that your medical expenses will exceed that.) I happen to be extra “lucky” in that I broke my wrist dancing earlier this year, and my out of pocket expenses for that surgery satisfied my deductible, so my hip replacement itself was on the house (i.e. my insurance paid for it).
Fourth, and even if you can’t deduct them as a medical expense, when you are done with all of your various medical equipment you can donate it to any number of charities, and take the charitable deduction on your taxes, for which there is no minimum (just don’t try to both claim it as a medical expense and as a charitable deduction).
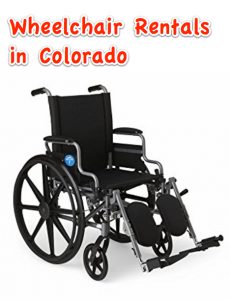
Ok, so, as soon as I realized that I was going to be hop-along-Annie for six weeks, I ordered this wheelchair on Amazon (remember that the text link is not an affiliate link, but the image is):
Now, the cool thing about this wheelchair is that for what you get, it’s reasonably inexpensive at $188 which includes free 2-day Prime shipping.
Also, it’s pretty lightweight, and, coolest of all, the arms flip up and out of the way (easily) so that you can belly right up to any dining table.
Wheelchair with Arms Flipped Up and Folded Back
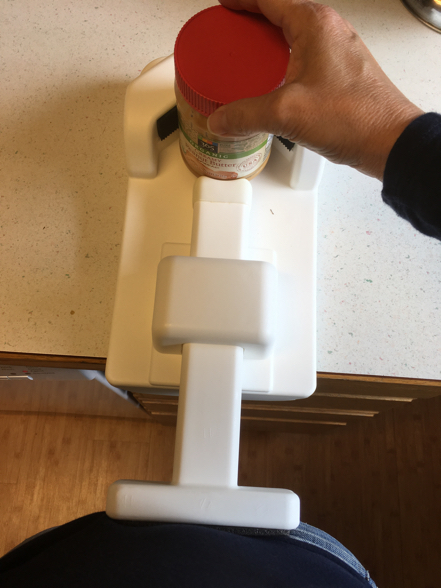
This was the first wheelchair that I got. But after a couple of days with it, and being in it for hours on end, my back started to hurt from the strain of constantly making sure I was not fully upright and risking bending at fewer than 90°. Don’t get me wrong, it is great for a couple of hours, but not for much more than that.
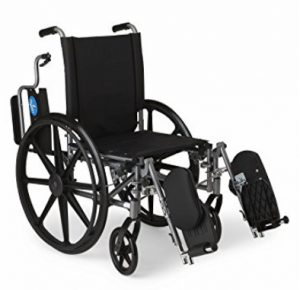
So, I thought to myself, “How cool would it be if there were such a thing as a reclining wheelchair??”
Then I thought “I wonder if there is such a thing as a reclining wheelchair!?”
Then I got on Amazon and discovered that there is!
Now, this wheelchair is a bit more expensive than the first one (~$300 and free shipping), but if you can only get one wheelchair, this is the one to get – but be warned that it is bigger, and heavier, and so not as portable.
I should mention that I am sitting in this wheelchair as I type this. In fact, I’ve been in it for the last 6 hours, and I feel great. Yesterday I was in it for at least 12 hours (of course getting up and walkering to the bathroom, etc.) and felt great. This wheelchair is a gamechanger for anyone who has had a hip replacement and is under those no-weight and no-sitting-at-91°+ restrictions.
So what did I do with the first wheelchair? Remember how I mentioned that it was quite portable, and that the reclining wheelchair..isn’t?
So, the first wheelchair now lives in my car, where it is perfect for being out and about for a couple of hours, and for going out to eat (because of those nifty swing-away arms).
Of course, even with a wheelchair or two, you will need crutches or a walker, or both. I strongly recommend at least one walker, because they are a hell of a lot more stable than crutches. Actually I recommend two or more walkers (one for getting in and out of the car, for example), another as your regular in-house walker that stays in your house.
Now, your surgeon can write a prescription for a walker and crutches (and he may even write one for a wheelchair) in which case your insurance may cover it.
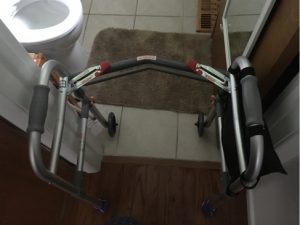
Here’s what you need to know: if your house, like my house, has any narrow doors, any standard walker is unlikely to fit through them full-frontal (and you do not want to be twisting around sideways to get through the door). In my case, my 1970s house has 23″ (twenty-three inch) doors on all the bathrooms. That’s narrow, folks! Take into account the door jam, and the door edge when the door is open, and that brings the navigable opening down to 21″ inches, 22″ if you’re lucky.
One of My Bathrooms – That’s One Narrow Doorway!
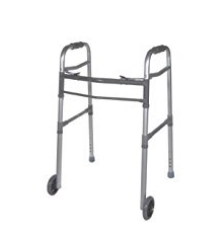
Guess what? Walkers are almost universally 23-24″ wide at the base (you have to measure at the bottom, across the “feet” of the walker, as they are wider at the base than at the top, for stability).
I’ve done a lot of research, and there is one company (Hugo) that used to make a 20″ walker. The operative term is “used to”. Hugo’s (very well reviewed, and deservedly so) walkers are now all 23.4″ walkers. (I found what was probably the last 20″ Hugo walker on eBay; eat your heart out.)
However, there is one (and so far as I could determine after lots of research only one) walker that you can ‘hack’ to bring its widest part down to 20.5″.
The ‘hack’ is putting the right wheel on the left leg, and vice versa. This has the effect of putting the wheels on the inside instead of the outside, bringing the widest part (the base of the legs) down to 20.5″. It’s very easy to do – almost like they expected people to do it. :~)
As you can see in this picture, this allows the walker to just barely fit through my crazy-narrow doorways. (I almost fell over trying to take this picture – don’t try this at home.)
Back to Blood Thinners and Other Clot Prevention
As I mentioned above, you will be on blood thinners (probably Coumadin) for the first month. Not only does this mean that you can’t have just about any over-the-counter medication or preparation (Advil and other NSAIDs are out, Pepto Bismal is right out, pretty much everything is right out), but it also means that you may need to change your diet and it will mean that you have to normalize your diet so that you are eating roughly the same thing every day for that month that you are on blood thinners.
In reality, it’s not what you eat that you need to normalize, but your Vitamin K intake that you need to standardize, because Vitamin K is the coagulating factor, and of course the reason you are on blood thinners is so that you don’t get a clot. The more Vitamin K you eat, the higher the dose of blood thinner you will need, and if you don’t eat roughly the same amount of Vitamin K every day, then your doctor won’t be able to regulate how your blood is clotting. They monitor this by having you take several blood tests over the course of the month.
Now, in my case I had to radically change my diet, because I’m a strict vegetarian eating a very healthful (usually) diet, so I get a ton of Vitamin K (usually a good thing). Leafy greens are out. In fact pretty much anything green is out, including green herbs, green vegetables, etc.. Most nuts are out. Nut oils and vegetable oils are out. Onions, garlic and ginger are out. Chia seeds are out. Chamomile is out (in fact any herbal tea is out, although black tea is just fine). And on and on.
I hasten to add that these things don’t have to be out if you have someone who will make sure that you are getting roughly the same amount of Vitamin K every day. So if you want to have a big old leafy green salad, you need to have roughly that same thing every day. In my case, it is a whole lot easier to just avoid it all.
In addition to those blood thinners, your surgeon may also have you wear compression stockings. Ones that come all the way up to your thighs. 24 hours a day. For weeks. Which is just as well that it’s round the clock because you can’t bend to take them off or put them back on.
I HATED those damned compression stockings. They made it very difficult to sleep at night. I was allowed to take them off at 2 1/2 weeks and I was thrilled.
If your experience is like mine, you will wake up from surgery with those stockings already on you. And on top of that, your legs will be inside these pneumatic squeezy things that squeeze your legs every minute (they are very serious about avoiding clots, because without all of these clot avoidance measures the odds of someone who has just had hip surgery developing a blood clot is apparently very high).
I didn’t mind the leg squeezers, but I sure did hate those stockings!
Toileting
Going to the bathroom when you’ve just had hip replacement surgery presents unique challenges. You’re not allowed to sit at anything more acute than 90°, let alone bend forward to wipe. Some recommendations say that you should not twist around, and in any event you won’t want to because your incision and muscles will yell at you.
Everybody is going to tell you to get a raised toilet seat; in fact your surgeon can write you a prescription for one.
This is because for people who are average height (whatever that is) or on the taller side, sitting on a normal height toilet seat necessarily pitches you into a more acute angle than 90°.
I’m 5’3. That damn raised toilet seat made me feel like Edith Ann in that big old rocking chair. It had precisely the opposite effect than intended, because my feet didn’t even reach the floor, so my hips were definitely forced into a dangerous angle. Fortunately, I’d gotten all of this equipment a few weeks before the big day, so that I could practice with it, and so I discovered this problem when I could still do something about it.
What I did about it was rip that raised toilet seat out, and upgrade my regular toilet seat to this amazing bidet toilet seat.
This seat was easy for me to install (took about 20 minutes), and in one fell swoop it dispensed with both the “how to effectively wipe” problem, and the matter of keeping me clean ‘down there’ when, as it turned out, I wasn’t going to be up to trying to take a shower for the first couple of weeks.
After a lot of research I settled on this particular bidet because a) it got wonderful reviews, and b) it actually heats the water, and c) it has several different functions (posterior, feminine area, etc… it even has a dryer!)
I don’t know what I would have done without it.
Now, all that said, even if a raised toilet seat is not for you, you will need handrails on either side of your toilet (raised toilet seats come with the handrails included).
I have no opinion on these, because I cannibalized a free-standing bedside commode that I happened to have, and used the handrails from that around my be-bidetted toilet.
Underwear
While we’re in that area, let me take a moment to talk with you about underwear.
You are going to have an incision that is several inches long, starting on your hip, and running down towards your leg.
That means that the leg holes for many styles of regular panty or briefs are going to hit right across your incision. Ouch.
So, before my surgery, I started searching for various types of panty styles that would be comfortable and not binding on my incision, and with a length that would not have the elastic of the leg opening laying right on my incision.
I ordered several styles of underwear that I thought might work. I did this before my surgery, so that they would be ready when I got home. And when I did get home, and tried them on (which in and of itself was a chore, remember you can’t bend that operated-on leg less than a 90° angle, so you have to keep that leg pointed away and down, and use a reacher grabber tool (see below) to ease the panty over your foot and up your leg), I discovered that all of them were very uncomfortable on my poor incised hip…except one. Now, to be honest, as I opened all of the packages, before going in for my surgery, I was pretty sure that these ones would be comfy, it was kind of obvious right off the bat. But I still tried all of the others on anyways.
These boy short briefs not only were the only style that wasn’t uncomfortable; they are in fact extremely comfortable!
As I said in my review of them on Amazon, “The moment I put them on I felt like… well… you know that feeling when you put on your favourite pair of old, broken-in jeans? That “Aaaaaah” moment? That is how these briefs felt from the very first time that I put them on (which was the day after surgery).”
They are super soft, yet not at all clingy. And because you want to avoid having them irritate your incision, which at least on me they completely cover, so no edge is touching my incision, I strongly recommend that you order them one size up from the size that you would ordinarily order. That way, instead of them being form fitting, like in the picture, they will allow a tiny bit of room so that they don’t ride on your incision.
Men: You are probably already familiar with soft cotton boxer briefs. If you don’t wear them, now is the time to start. Get them a size larger than you normally would.
Sleeping
If your hip surgery goes anything like mine, you will wake up to find a pillow stuffed in your groin. Well, not in your groin, but groin-adjacent.
The reason for the pillow, or at least one of the primary reasons, is to make sure that you do not rotate your operated-on hip while you are sleeping, or bring it in closer to the midline of your body than a neutral position (which is also why you are not allowed to cross your legs).
Depending on what type of hip replacement you have (posterior or anterior, and maybe even on the type of appliance they use) your surgeon may tell you that you must sleep on your back for the first few weeks. (This was horrible for me – that combined with the d*mned compression stockings made for many nights where I got little sleep. Now, I don’t believe in taking sleep medications, but I was ready then! But..nooooo..no sleeping meds because… blood thinners. The only sleep med I could take was Benadryl, which didn’t touch it. But I digress, again.)
Eventually you will be allowed to sleep on your side, but only with a pillow between your knees and ankles, so that, again, your operated-on leg doesn’t stray across that midline, into the danger zone. At some point you may be able to do away with the pillow – I don’t actually know yet what my own surgeon’s rule is on that, I’ll be asking at my 6-week check.
Now, I ended up ordering and trying six..count ’em, 6 different pillows promising comfort for your legs, in varying shapes and sizes, and all but one of them were awful. Fortunately that other one is wonderful.
This pillow really is ideal. First of all, it’s long enough to actually pad both your knees and your ankles (which is super important to ensure that your operated-on leg stays in a neutral position).
It’s also, at least for me, just the right thickness, while being not too firm, and not too soft. That’s very Goldilocksian, I realize, but you are going to find that it’s critical that what you have between your legs is just the right fit (yeah, I know). Otherwise you will not only be too uncomfortable to sleep, but it can also cause pain at your incision and for those poor muscles that have been ..well, you don’t want to know (I actually read my operative report… my advice is do not read the nitty gritty details about what a hip replacement surgery entails before your own surgery. And only after if you are sure you can stomach it).
Various Things That You Will Want to Make Life After Hip Replacement Surgery Easier
Here are some things that, over the weeks following my own total hip replacement surgery, I found made life much easier.
Reacher Grabber Tools
First, and foremost, is the reacher grabber tool (reacher grabber, not grabber reacher, whom I think is Jack Reacher’s cousin). Now, the ones that come in ‘hip surgery kits’ (both on Amazon, and that your surgical center may give you) SUCK. I don’t know why they are rated 4 stars out of 5 on Amazon, but if you read the negative reviews, they all say the same thing that I found to be the case.
The problem with some reacher grabber tools is that (as many reviews say), the elastic attached to the ‘jaw’ of the grabber doesn’t always retract, so that the claw stays shut. In fact, on the two that I have, the jaw sometimes twists and get stucks up on the side of the bar, so that the claw is jammed shut!
Which is why I recommend this reacher grabber tool instead. In fact, it’s so good that I bought two more (hint: you will want to have reacher grabber tools strewn about the house in several rooms).
Weirdly, at the time that I’m writing this, the listing for that reacher grabber on Amazon says that they are currently not shipping it “because customers have told us there may be something wrong with our inventory of the item, the way we are shipping it, or the way it’s described here.” I’m guessing that by the time you read this it will be fixed, but just in case not, here are two more reacher grabbers to check out.
This reacher grabber tool is made by the same company, Vive, as the one that I like so well. The head is a bit different, in fact it looks like it might work even a bit better than the ones I have (if that’s even possible!):
And this other reacher grabber tool looks identical to the one that I like so well, other than it having blue bits, although I note that it’s made (or at least branded) by the company (RMS) that makes the reacher grabber that I dislike so much.
A Tray to Carry Stuff on Your Lap While in a Wheelchair
If you are going to get a wheelchair (and I really do recommend it), both of your hands will be full of, you know, wheel, as you move about your house. I found that this tray is the perfect size to sit right on your lap as you are wheeling around, and it has nice deep sides (2″ deep) to keep things in the tray rather than tumbling off the edge.
Of course, if your house is anything like mine, you may find that on occasion your lap is full of cat, instead.
Gripper Pad Rounds
You will also want to line your tray with a few of these round gripper pads to make sure that things that you put in your tray on your lap don’t slide around while you are wheeling through the house. You could also get a roll of the same material and cut it to fit, but these disks are so useful for all kinds of things, plus they come in a package of 12 for $6. How can you go wrong? I actually first discovered these when I broke my wrist, as they are great for keeping something from sliding around the counter when you are trying to open it.
A Tip-Proof Coffee Cup
I have had two of these HotJo brand tip-proof travel mugs for decades. They are fantastic. They are solid stoneware, a generous 18 ounces, and the recessed lid clips in. And they are truly tip-proof.
They are exactly what you want for ferrying your hot coffee or tea, in your tray, from the kitchen to your living room/dining room/desk/table/bed.
Plus, if you, like me, like sipping your beverage through a metal straw (because plastic straws leach BPA and other nasties when used with hot beverages, and some even melt), the sip hole in the lid perfectly accommodates those metal straws!
A small crossbody bag will become your best friend. You will find yourself wearing and using it constantly to carry small things (your phone, a prescription bottle, your glasses, etc.), and it will be especially handy while you are using your walker or wheelchair.
I was really lucky in that my Hugo walker came with not just one, but two saddlebags (one on each side). So I took one off and put it on one of my other walkers. I use these saddlebags all the time (that is when I’m using my walker, which I still have to do to get to the bathroom, or out of the bedroom to the main part of the house where the wheelchair is (the wheelchair can’t maneuver in through my bedroom door which is on the side of the end of a narrow hallway).
But if I didn’t already have saddlebags, I would totally get this one, which has great reviews and is only $12, to boot!
I hope that you have found this helpful; I know that I wish that I had had such a resource before I went in under the knife!
The other day I went searching online for a predatory bird silhouette that I could download, print, cut out, and tape to my windows to keep birds from flying into the window. I was shocked that one was not easy to find, so I created one and here you go!
I have had bird tape on my windows for a few years, and generally it works okay, but every once in a while I still hear that “THUMP!” of a bird flying into a window. And always with my heart in my mouth, I slowly go and open the door, and peer out, dreading what I will see.
This happened again just yesterday, and while there was no sign of a bird in distress anywhere near the window into which it had flown, I just wanted to stop it from happening.
Hence my online search for a bird decal that I could download and print. And, as I mentioned before, I was astonished that there was nothing out there, at least that I could find. And I’m pretty good at searching on the Internet, so if it was difficult for me to find, I have to imagine others are having the same trouble.
So here you go, feel free to download this bird decal, print it out, trim it, and tape it to your window!
To download your free bird decal for your window click on the image below and save the full-size image to your computer
These are my tips for temporarily (or permanently) living with just one hand. A few weeks ago I broke my wrist (or, rather, had it broken for me). This has meant that I have had a crash course in how to live and get along with the use of only one arm, and just one hand. In addition to my wrist being broken, I had to have surgery on it, and a metal plate put in it, which means that I will not be able to use my left arm at all for at least a total of two months.
At least I have a good story, as when people ask me how I broke my wrist I am able to truthfully answer “dancing!”
In the few short weeks since that fateful night, I have learned a number of tips and tricks (or “hacks”, in Internet parlance) that have made it much, MUCH easier for me to adapt to only being able to use one hand. So I figured I would share them in case others find themselves in the same situation. In fact, I have been sharing some of them on Facebook and people seem to find them useful, or at least interesting.
I will be adding to this regularly, starting with a few tips and then adding others (because hey, doing this one-handed!)
Where applicable I am including links to items, and pictures if useful.
Please feel free to add you own one hand tips in a comment!
Good luck with your one-handed journey, whether temporary or permanent!
Anne’s Tips for Temporarily Living with Just One Hand
Anne’s Tip for Living with Just One Hand #1:
Get this ingenious one-handed jar opener!
This brilliant device is called the Belliclamp Jar & Bottle Opener (Get it? Belly clamp). This is because it is essentially a vise for jars and bottles, and you hold the bottle or jar in place with your belly or hip, freeing up your good hand to twist the top off.
You can get the Belliclamp One-handed Jar & Bottle Opener here on Amazon.
Don’t let the anticipated shipping time on the Amazon site scare you, I got mine within a week of ordering it.
Anne’s Tip for Living with Just One Hand #2:
Have your hair washed and braided at the hairdresser
Unless your hair is very short, go to the hairdresser and have them wash your hair for you and then put it in a couple of French braids. You would be amazed at how long your hair will last in this way (I only need to do it about once a week) and your hair will look much nicer, not to mention it being less of a hassle! As a side benefit, it will be much more comfortable sleeping with a braid on either side of your head!
Anne’s Tip for Living with Just One Hand #3:
Modify a big hoodie!
Buy a really big hoodie with a zipper down the front. Cut the cuff off the arm on the side where your cast or splint or a brace or bandage is. The arm of the hoodie, without the cuff, will slide easily over your injured arm, and you can roll the end of the sleeve up a little bit, and roll the cuff on the other sleeve up, and it will be barely noticeable that the two sleeves are different.
And, as an added benefit, pockets!
Anne’s Tip for Living with Just One Hand #4:
Put your food in big Pyrex measuring cups!
Use big Pyrex measuring cups for your food instead of regular bowls and plates, they come with handles!
In the picture below, I have salad in the 4-cup Pyrex measuring cup, and hummus and crackers in the 8-cup Pyrex measuring cup. (Hint: a 2-cup Pyrex measuring cup perfectly holds a pint of Ben and Jerry’s ice cream, container and all! ;-))
You can order a set of 4-cup and 8-cup Pyrex measuring cups together here on Amazon.
Upcoming tips: [Update on 3/10/22: I just realized that I never did the rest of the tips, owing to the fact that shortly after my wrist surgery I found myself having a hip replacement, and then I was caught up in that. But I will try to still get to these tips now that I’ve been reminded – I’m sorry about that!]
Tall deodorant
Simply home trashcan
Light dimmer
Rubber discs
Proxy brushes
Front close bra
Cast cover for shower
Have chef cut up food
Lever door knobs
Dictation software
Pyrex measuring cups with handles
Air fryer
Macros
Instacart
Letter opener
Scissors everywhere
Long handled screwdriver
Weighted tape dispenser
Moon Juice, purveyor of incredible plant-sourced edible dusts and powders to enhance beauty, spirit, sleep, brain function, and even sex, ships their powders and dusts with instructions to use either a “small spoonful,” a “spoonful,” or a “heaping spoonful.” But what exactly do they mean by a “spoonful”? Is it a teaspoon? A tablespoon? Something else? Well, I found out directly from MoonJuice.
First, if you’re not familiar with Moon Juice, here’s how they describe their products:
We celebrate the unadulterated, exquisite flavors and healing force of raw vegetables, fruits, petals, herbs, roots, nuts and seaweeds as daily nourishment, beauty tools and high-powered natural remedies. Explore our organic pressed juices, Moon Milks, Cosmic Provisions, the Moon Pantry and our Moon Dust collection.
As Muses and Visionaries (M&V) magazine explains, “Moon Juice doesn’t rely on cheap tricks; it relies on magic. A California holistic food pantry and apothecary created by Amanda Chantal Bacon, the company pro- duces mystical tonics, juices, milks and snacks aimed at enhancing nature’s healing powers.”
Now I don’t know about the “magic” part, but I will say that both their powders and their Moon Dusts are incredible!
However, their powders all come with use directions such as “blend a small spoonful” or “blend a spoonful” or “blend a heaping spoonful” into nut milk, tea, a smoothie, etc., and nowhere does it explain what exactly they mean by ‘spoonful’. Not on the products, not on their site.
So, I went straight the source, and asked them. I sent them a note saying “Can you please help me understand better what sort of measurement do you mean by “spoonful” “small spoonful” “heaping spoonful”? Is a small spoonful a measuring teaspoon? A heaping spoonful a heaping teaspoon or a heaping tablespoon? Inquiring minds want to know!”
And here, straight from Moon Juice, is the answer:
By “a small spoonful” we generally mean 1/4-1/2 tsp. Start with 1/4 tsp and if you feel the need to add more over time go for it!! Every body is different so we really try to make general guidelines.
By a heaping spoonful we generally mean a heaping teaspoon. Again, it’s all subjective to you and how you react! Feel free to start with a regular teaspoon at first (like with the Maca as it is energy boosting!) and go up (or down) from there depending on how it works with your body. It’s really a learning process, just listen to your body 🙂
Here’s a simplified chart for Moon Juice spoonfuls:
Is atenolol making your cat urinate everywhere and also very thirsty? Inappropriate urination is not listed as a side effect of atenolol (frequently misspelled as ‘atenelol’), and so your vet may not believe you that your cat started peeing everywhere and became crazy-thirsty while on atenolol (Tenormin), but I believe you.
This all started when our vet detected a heart murmur in our cat, Charlie. He prescribed atenelol, which reduces the beats per minute (BPM), so that the heart isn’t working harder than it ought.
According to 1800PetMeds, “Atenolol is a beta-blocker used to treat certain heart conditions such as arrhythmias. It may also be used to lower blood pressure and treat enlarged hearts in cats.”
It is also used to treat hypertrophic cardiomyopathy (HCM) in cats. The first treatment for feline HCM listed by the Cornell School of Veterinary Medicine is controlling heart rate, which atenelol does.
Technically, that is with what Charlie was diagnosed at his most recent checkup.
Anyways, Charlie has always been prone to peeing where he shouldn’t. It started the day that we returned home from a vacation, and he expressed his pleasure at seeing us by peeing on my pillow. (Of course I’m being sarcastic there – he was expressing his displeasure at our having been gone. He’s an articulate little bugger.)
Once he did that, the floodgates opened, as it were, and he started peeing on any soft thing left on the floor. No longer could we have area rugs – but it was great incentive to not leave clothes on the floor.
Eventually, though, he calmed down, and so long as we didn’t leave a tempting t-shirt on the floor, the house stayed mostly dry.
Enter atenolol.
We’ve tried him on it a few time. Each time, the record reflects (by which I mean his medical records) that there was an increase in his peeing anywhere and everywhere (mostly in corners, on the hard floors, because we had all of our carpeted floors gated beyond his reach). My vet recently told me that it was noted in Charlie’s chart that the last time this happened, we added amitriptyline (Elavil) to Charlie’s medications, and that helped with the urination.
So, this most recent time of trying the atenolol again, I noted the appearance of two phenomena almost immediately: Charlie started peeing all over the place again, and Charlie started demanding water, water, everywhere.
My vet advised all of the standard ‘inappropriate urine elimination’ measures, clean litter box, etc..and of course the Feliway or other cat pheromone devices.
Not to be so easily thwarted, he started peeing right next to the pheromone diffusers (Charlie, not my vet).
The cat pheromones are typically used to help calm a cat down – they can help with inappropriate elimination in cases where the cat is doing it to mark his territory, etc.. This clearly wasn’t one of those situations.
Plus, there was the increased water intake piece.
Charlie had at one time had a habit of running to the sink ahead of your walking into the bathroom or the kitchen, jumping onto the sink, and loudly demanding that you turn on the water for him to drink. But he hadn’t done it in ages.
Then, within a day or so of starting up the atenolol again, he started demanding water again – he was clearly very thirsty.
Of course, the increase in water intake most likely has something to do with the increased urine output, but not, mechanically at least, with where that output was occurring. (I should add here that Charlie does use the litter box, for both urinating and number two.)
So, I stopped the atenolol again, about two days ago, and yes, his demanding water has all but stopped; and I’m monitoring to see if the urinating where he shouldn’t stops as well.
Anyways, I am posting this primarily for others who may be noting the same symptoms once their cat has started on atenolol, because there is nothing on the Internet that talks about this.
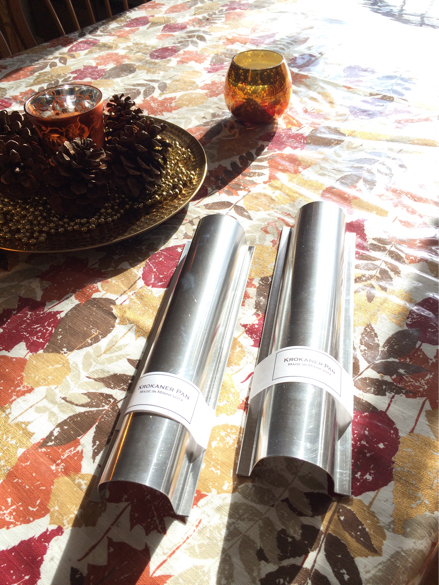
Whether you call them Krokaner or Kro Kaner cookies, Krokta, Bridge cookies, Saddle cookies, or even Horse Collar cookies, the odds are good that you ended up here because you are trying to find the Krokaner Pans (or Krokaner tins) and can’t find them anywhere. Of course part of the problem is that they go by so many names, but the real problem is that they are impossible to find anywhere in the U.S. – unless you know where to look.
They used to be available through Maid of Scandinavia, which, along with Sweet Celebrations, was borged by KitchenKrafts. So, no more.
At that point, the only place that carried them was Ingebretsen’s in Minneapolis, but some time ago they too removed them from their website.
BUT THEY STILL CARRY THEM!!
That’s right, Ingebretsen’s in Minneapolis actually still carries Krokaner tins, and I have the picture to prove it, because mine just arrived today!
Aren’t they purty? :~)
So, here is what you need to do to get your very own Krokaner pans, Saddle cookie tins, or whatever you want to call them.
Call Ingebretsen’s at 800-279-9333. Ask to speak with Debbie, as she is the one who will know what the heck you are talking about.
They are $20 each, and shipping and handling for my two came to $8.50.
By the way, if you need a recipe for the Krokaner cookies, here are some good ones:
Did the California Franchise Tax Board (FTB) levy your bank account even though you don’t live in California? They may have levied your account and taken your money because you maintain an active professional license in California. Even if you haven’t lived there in years, if you continue to keep your California professional license active – be it a license to practice law, a medical license, a hairdressing license, or some other license – then California assumes that you owe them income tax, and will take the “average amount that your profession owes in California” unless you take steps to let them know that you have not had any California earnings. Each and every year.
I know all this, because this happened to me just last month, October 2015. I am fortunate in that I happen to have an awesome relationship with my bank, so when I logged into my bank’s portal to check my account balance, and noticed that a bit over ten thousand dollars was suddenly unavailable to me, with no explanation or warning, I was able to call the bank, and someone there said “Well, the note says ‘FTB’ put a levy on your account.” Fortunately, I remembered that FTB stood for the California Franchise Tax Board, from back when I lived in California, and actually had to file income taxes with the FTB – more than 8 years ago.
That’s right, I have not lived in California at all, and have not earned any income in California, in more than eight years.
Clearly something was rotten in the state of California.
The person at my bank said that I would need to call the Franchise Tax Board, which I did.
The number for the California Franchise Tax Board Office of Collections, which is where you need to call, by the way, is 800-689-4776.
And after going through the automated voice menu, a recording told me that my anticipated hold time was more than 3 hours.
But what choice did I have? They had taken my money, with no warning, and if I wanted them to release it, I had to talk with them.
So I waited.
But fortunately, despite the FTB Collections line telling me that the estimated hold time was going to be 3 hours, in fact it was only 21 minutes.
And I talked with a shockingly nice woman, who explained the following to me:
All California licensing agencies provide a list of active professional licenses to the FTB, every year
The FTB matches that list up with all of the income tax returns they have received for that year
If you have an active professional license in California, and if you haven’t filed a California tax return, they will impute an amount of income to you equal to the average income that someone with your professional license has, and levy that amount
EVEN IF YOU DON’T LIVE IN CALIFORNIA ANY MORE
They claim to send out notices of intent to levy (as they are required to do), but I never got one
Even if you do get the notice of intent to levy, you have to prove to them that you did not earn any money in California
EACH AND EVERY YEAR
This means that for so long as you choose to keep your professional license active in California – while not living or earning money there – you will have to rebut the notice of intent to levy each and every year, and if you don’t get the notice, you could end up having a levy levied against your bank account, and then have to deal with that.
Each. and. Every. Year.
I actually ended up having to talk with two different people, because the first one had me fax my Colorado tax return to her (to prove I had filed elsewhere and didn’t owe California any money), and promised that she would have the levy lifted as soon as she got it – and then went out sick for the rest of the week. After a few days with the levy still in place (and don’t forget that after a set time, they completely remove the levied funds from your bank account, transferring them to California’s tax fund, so I was pretty motivated to get this taken care of before that happened), I called back, and got another very nice person who said “Oh, she’s out sick, let me help you.”
Both of these people confirmed that this will happen every single year, so long as I continue to keep my California license to practice law active.
And they also both confirmed that this is the case for any active California professional license.
My own plan to make sure that I never get caught up short like this again is to simply file a $0 California tax return every year. One of the FTB collections people said “Oh, you don’t have to do that, it will cost you extra money to your accountant. Just challenge the levy notice each year.”
Uh, thanks, but no thanks, I’d rather have the peace of mind, and give my accountant an extra $25.00, than risk bouncing checks (and the attendant fees) because California can’t figure out that the Colorado address to which they should have sent the notice of levy means that I probably am not on California.
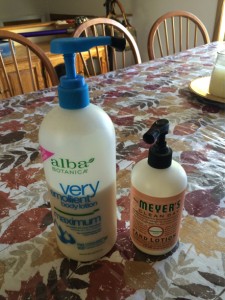
Here is how to stop lotion from developing that plug of dried lotion in the tip of a pump dispenser bottle. I mean, what’s the point of the convenience of a pump bottle if the pump gets clogged with that plug of dried lotion, right?? Some day somebody is going to invent a clog-free pump, but until then, here is how to keep lotion from drying out and clogging up the pump with that annoying plug of lotion.
The secret is to get a package of rubber chair tips (I use 3/4 inch tips) which you can pick up at any hardware store for a few dollars.
Rubber Chair Tips
You just slip one over the tip of the pump, and your lotion stays nice and..er.. lotiony. No more dried-up lotion plugs!
Rubber Chair Tips Keep Lotion from Drying Out in Pump
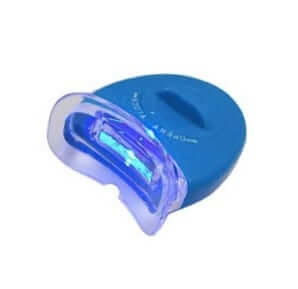
Yes, it’s really true. I didn’t believe it myself, but I figured what the heck, I can afford $3.00 to check it out. The device is a “LED Accelerator Professional Teeth Whitening Light”, and it actually works to accelerate the whitening process when used with tooth whitening gels.
Why does it work? I have no idea. According to the Journal of Dentistry, “the treatment with supplementary light showed significantly greater bleaching-dependent changes in color compared to treatment without light when assessed using instrumental methods.”
According to me, holy cow! This thing arrived – and remember, I paid only $3.00 for it (it arrived from China… I’m just sayin’), – and it really works. Using whitening gel in trays, and this light, I’ve seen a huge difference.
So now I’m sharing this information with you, my faithful readers. (By the way, be aware that there are two disc batteries in the light, and they have a piece of plastic in with them to keep the batteries from discharging during shipping – you need to remove that piece of plastic for the light to work.)
I do not use affiliate links or ads because I want you to know that if I am recommending something it's because I really use it myself and recommend it, and not for financial gain. And I try to offer helpful information as I find or figure it out. But it does cost me money out of my pocket to keep the site running (since 2006!), so if you find something I've written helpful, please consider letting me know via CashApp, Venmo, or Paypal.
Hey, I'm sorry to interrupt, this will only take a second.
MangeMerde is free to everyone. I don't use affiliate links or put ads on the site because I don't want you wondering if I am recommending something just to get a commission. And I don't hide my articles behind a paywall, or subject you to annoying pop-up videos or dozens of ads. But it does cost me money to keep the site going (nearly 20 years so far!) So if I have provided some value to you today, won't you please let me know by putting a little something in my tip jar? Please and thank you!
Tip by
Tip by
Tip by
Or if you prefer to scan a Venmo or Paypal QR code: